We all work with data, but very few of us were ever formally taught how to analyze it in a structured, effective way. This often leads to hours wasted trying to make sense of complex spreadsheets. But what if you could turn that confusion into clarity in a matter of minutes? This guide will show you how to use ChatGPT for data analysis, transforming the powerful AI into your personal data analyst—no technical skills required.
By leveraging a simple yet powerful three-step framework, you can bridge the gap between raw data and meaningful insights. This method helps you understand new datasets faster and extract insights that, as a non-data analyst, you might have otherwise missed. Let’s get started!
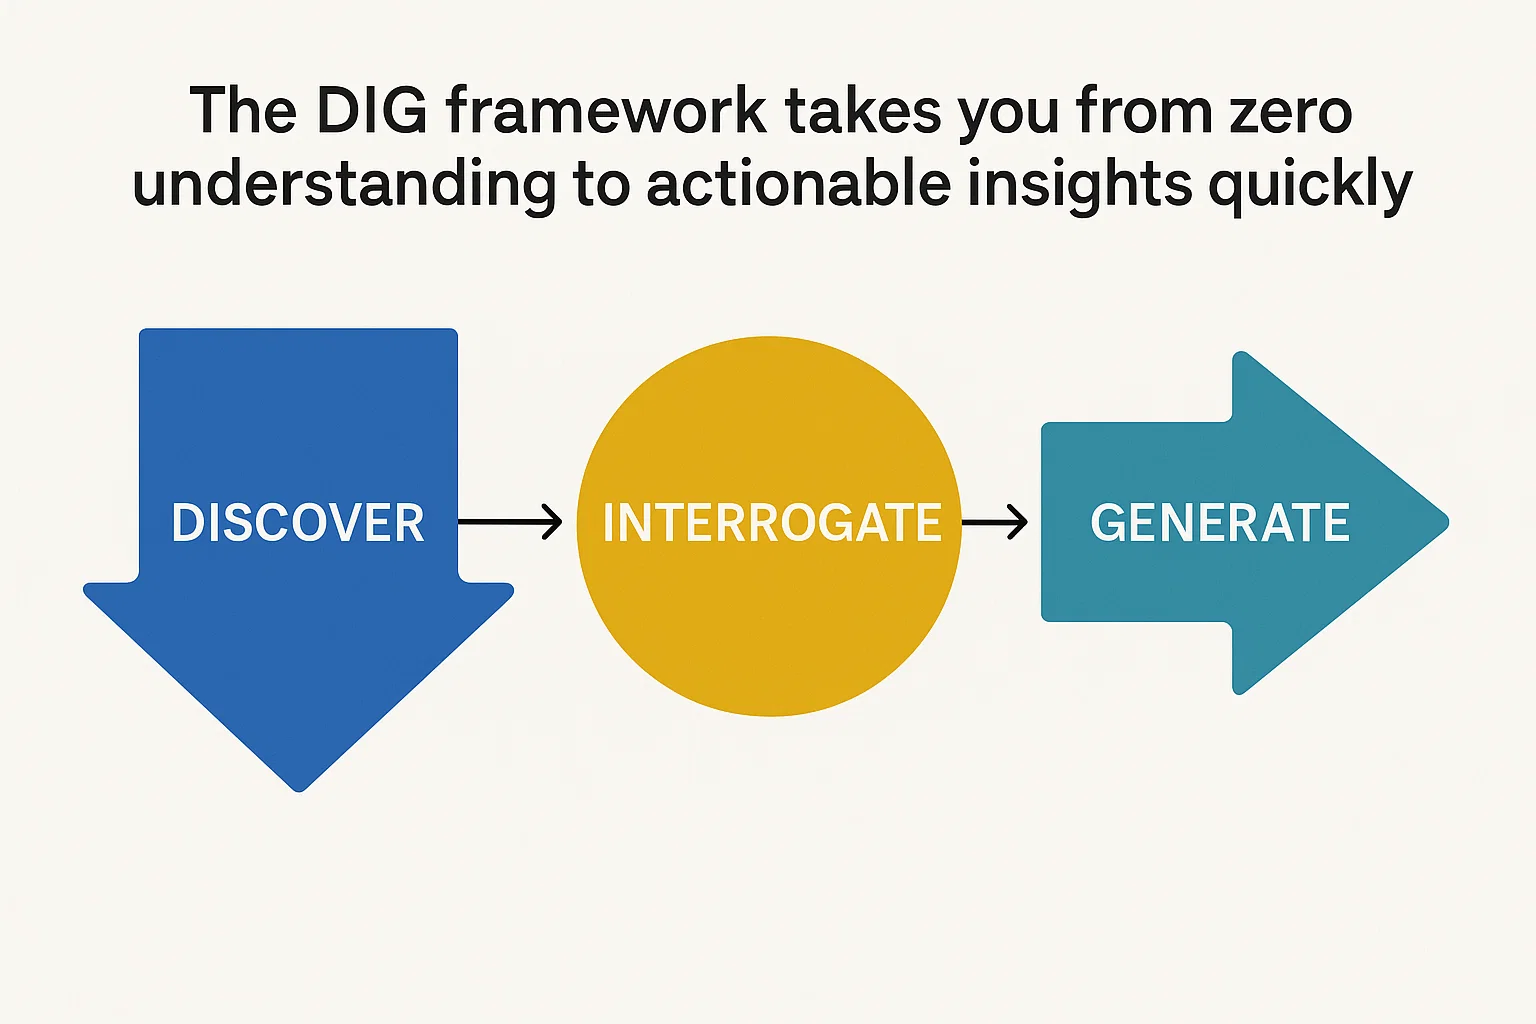
The DIG framework takes you from zero understanding to actionable insights quickly.
The DIG Framework: Your Secret Weapon for Data Analysis with ChatGPT
The core of this technique is a framework called DIG, which stands for Description, Introspection, and Goal Setting. It’s a simplified version of the industry-standard process known as Exploratory Data Analysis (EDA), but it’s much easier to remember and apply. By feeding ChatGPT prompts based on the DIG framework, you systematically build a comprehensive understanding of any dataset.
Think of it like this: when you receive a new spreadsheet, your understanding is at 0%. With each DIG prompt you use, that understanding increases, until you’ve uncovered meaningful insights that would have taken hours to find manually—if you found them at all.
Step 1: Description – Getting ChatGPT to Understand Your Data
The first step is all about getting ChatGPT to describe the data file as quickly and effectively as possible. This lays the foundation for all subsequent analysis. To do this, simply upload your CSV or Excel file to ChatGPT (this requires a Plus subscription) and start with these powerful prompts.
Description Prompt #1: Get a Column Overview
This initial prompt forces ChatGPT to scan every column and give you a high-level summary.
List all the columns in the attached spreadsheet and show me a sample of data from each column.
This is crucial because it gives you a quick, digestible overview instead of overwhelming you with the entire spreadsheet. It also immediately highlights the data formats in each column, helping you spot potential issues, such as multiple genres being listed in a single cell or a release year having a decimal point.
Description Prompt #2: Spot Inconsistencies with More Samples
A single sample might be an outlier. To get a more accurate picture, you need to look at more data.
Take 5 more random samples of the data for each column to make sure you understand the format and type of information in each column.
This helps you confirm patterns and spot inconsistencies. For example, you might see that some titles have one genre while others have three, or that a title is available in one country while another is available in multiple.
Description Prompt #3: Run a Data Quality Check
Now, let’s have ChatGPT explicitly look for problems. This is one of the most powerful tricks when using ChatGPT for data analysis.
Run a data quality check on each column. Specifically look for:
Missing, null, or empty values (give me counts and percentages)
Unexpected formats or data types
Outliers or suspicious values
This prompt is designed to find red flags. In the video’s example, this revealed that 99.7% of the data was missing for the “availableCountries” column, making any geographical analysis on that dataset completely unreliable. Discovering this early saves you from pursuing a dead end.
Step 2: Introspection – Brainstorming Questions and Possibilities
Once you and ChatGPT have a solid grasp of the data’s structure and quality, the next step is to brainstorm. The goal here is to instruct ChatGPT to think about what the data can and, just as importantly, *cannot* tell you. This tests whether the AI truly “gets” your data and often surfaces insights you hadn’t considered.
Tell me 10 interesting questions we could answer with this dataset and explain why each would be valuable.
If ChatGPT generates good, relevant questions, it’s a sign that it understands the dataset’s potential. If the questions are poor, it indicates a misunderstanding that needs to be corrected before proceeding. This prompt can spark ideas for your analysis that you might not have thought of on your own.
Introspection Prompt #2: Identify Data Gaps
This is my personal favorite prompt in this section because it manages expectations and prevents you from overpromising.
What questions do you think someone would WANT to ask about this data but we CAN’T answer due to missing information?
This surfaces the limitations of your dataset. For instance, you might want to know the most-watched genre, but if your data lacks viewership metrics, you can’t answer that. Knowing this upfront allows you to inform your boss or stakeholders about what insights are possible and what additional data might be needed. For more powerful analysis, you can often find supplementary data on platforms like Kaggle and merge it with your original file.
Step 3: Goal Setting – Guiding the AI Towards Your Objective
Analyzing data without a clear goal is like driving without a destination—you’ll burn a lot of fuel but end up nowhere useful. This final step is about giving ChatGPT a clear mission briefing so it can prioritize its analysis and deliver results that are directly relevant to your objective.
Align your data analysis with clear business goals for maximum impact.
Instead of a vague request, give ChatGPT a specific goal:
My goal is to understand what content Apple TV should invest in next. Given this goal, which aspects of the data should we focus on?
This prompt helps the AI prioritize what’s important (like unit economics, audience demand, and content supply) and ignore what’s not. The result is a practical, step-by-step roadmap tailored to your specific objective, turning a massive dataset into a clear action plan.
Key Takeaways for Mastering ChatGPT Data Analysis
This entire process is designed to be a simple, repeatable system that anyone can use immediately. Here are two final things to remember:
The DIG framework levels the playing field. You no longer need to be a formally trained data scientist to derive powerful insights from data. This process empowers any professional to work smarter. For more tips like this, check out our other AI How-To’s & Tricks.
This is just the beginning. While this guide covers the essentials, there’s always more to learn. The video’s creator learned this framework from a Coursera course that delves deeper into topics like mitigating AI hallucinations and debugging data errors.
By using ChatGPT for data analysis with a structured framework, you can save time, uncover hidden insights, and make smarter, data-driven decisions in your role.
The concept of intelligence ownership has been gaining traction in recent years, and for good reason. As Cisco has demonstrated, owning intelligence rather than renting it can be a game-changer for enterprises looking to scale their operations securely. According to a recent article by The Rundown AI, Cisco’s strategy to scale agents securely and reshape enterprise workflows is a prime example of this shift.
The Importance of Intelligence Ownership
Owning intelligence means having control over the data, algorithms, and insights that drive business decisions. This is particularly crucial in today’s fast-paced, data-driven world, where artificial intelligence and machine learning are becoming increasingly prevalent. By owning their intelligence, enterprises can ensure that their systems are secure, transparent, and aligned with their overall goals.
Scaling Agents Securely with Cisco
Cisco’s approach to scaling agents securely is centered around the idea of intelligence ownership. By developing and owning their own AI-powered agents, Cisco is able to ensure that their systems are secure, efficient, and tailored to their specific needs. This approach has allowed Cisco to reshape their enterprise workflows and improve overall productivity. As AWS and other cloud providers continue to evolve, the importance of owning intelligence will only continue to grow.
Cisco’s strategy is a great example of how owning intelligence can help enterprises scale their operations securely and efficiently. By taking control of their data and algorithms, companies can ensure that their systems are aligned with their overall goals and values.
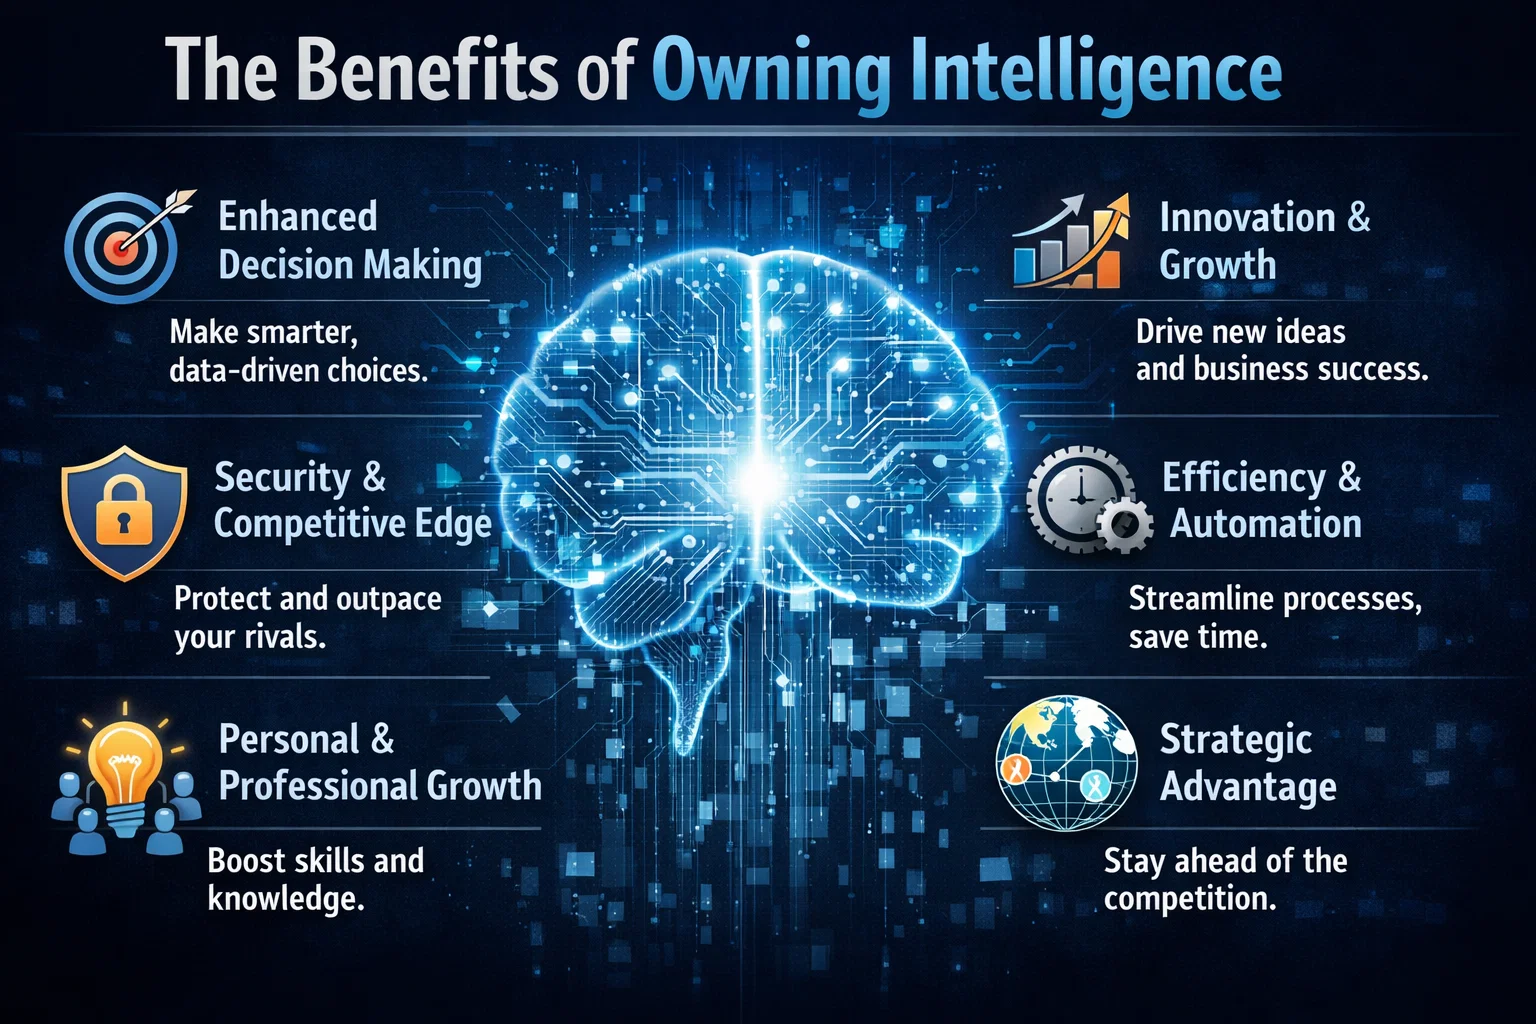
The Benefits of Owning Intelligence
So why should enterprises prioritize intelligence ownership? The benefits are numerous. For one, owning intelligence provides a level of control and transparency that is difficult to achieve with rented intelligence. It also allows enterprises to develop systems that are tailored to their specific needs and goals, rather than relying on generic, off-the-shelf solutions. Additionally, owning intelligence can help enterprises to improve their overall security posture, as they are able to develop and implement their own security protocols and measures.
In contrast, rented intelligence can be limiting and inflexible. When enterprises rely on rented intelligence, they are often at the mercy of the provider, with limited control over the data, algorithms, and insights that drive their business decisions. This can lead to a lack of transparency, security risks, and a general sense of disempowerment.
Real-World Applications
So what does intelligence ownership look like in practice? One example is the development of custom GitHub repositories, which allow enterprises to own and control their code and data. Another example is the use of Azure and other cloud platforms to develop and deploy custom AI-powered solutions. By taking control of their intelligence, enterprises can develop systems that are tailored to their specific needs and goals, and that provide a level of security, transparency, and efficiency that is difficult to achieve with rented intelligence.
The recent launch of the Cursor plugin marketplace is a significant development in the field of artificial intelligence, enabling users to extend the capabilities of AI agents with external tools. As reported by FutureTools News, this innovative platform is set to transform the way AI agents are used in various industries. The plugin marketplace is designed to provide users with a wide range of tools and services that can be seamlessly integrated with AI agents, enhancing their functionality and performance.
Introduction to Cursor Plugin Marketplace
The Cursor plugin marketplace is an online platform that allows developers to create, share, and deploy plugins for AI agents. These plugins can be used to add new features, improve existing ones, or even create entirely new applications. With the launch of this marketplace, Cursor is providing a unique opportunity for developers to showcase their skills and creativity, while also contributing to the growth of the AI ecosystem. As mentioned on the Cursor blog, the plugin marketplace is an essential component of the company’s strategy to make AI more accessible and user-friendly.
Benefits of the Plugin Marketplace
The Cursor plugin marketplace offers several benefits to users, including the ability to extend the capabilities of AI agents, improve their performance and efficiency, and enhance their overall user experience. By providing access to a wide range of plugins, the marketplace enables users to tailor their AI agents to meet specific needs and requirements. This can be particularly useful in industries such as customer service, healthcare, and finance, where AI agents are increasingly being used to automate tasks and improve decision-making. As noted by experts in the field, the use of machine learning and natural language processing can significantly enhance the capabilities of AI agents.
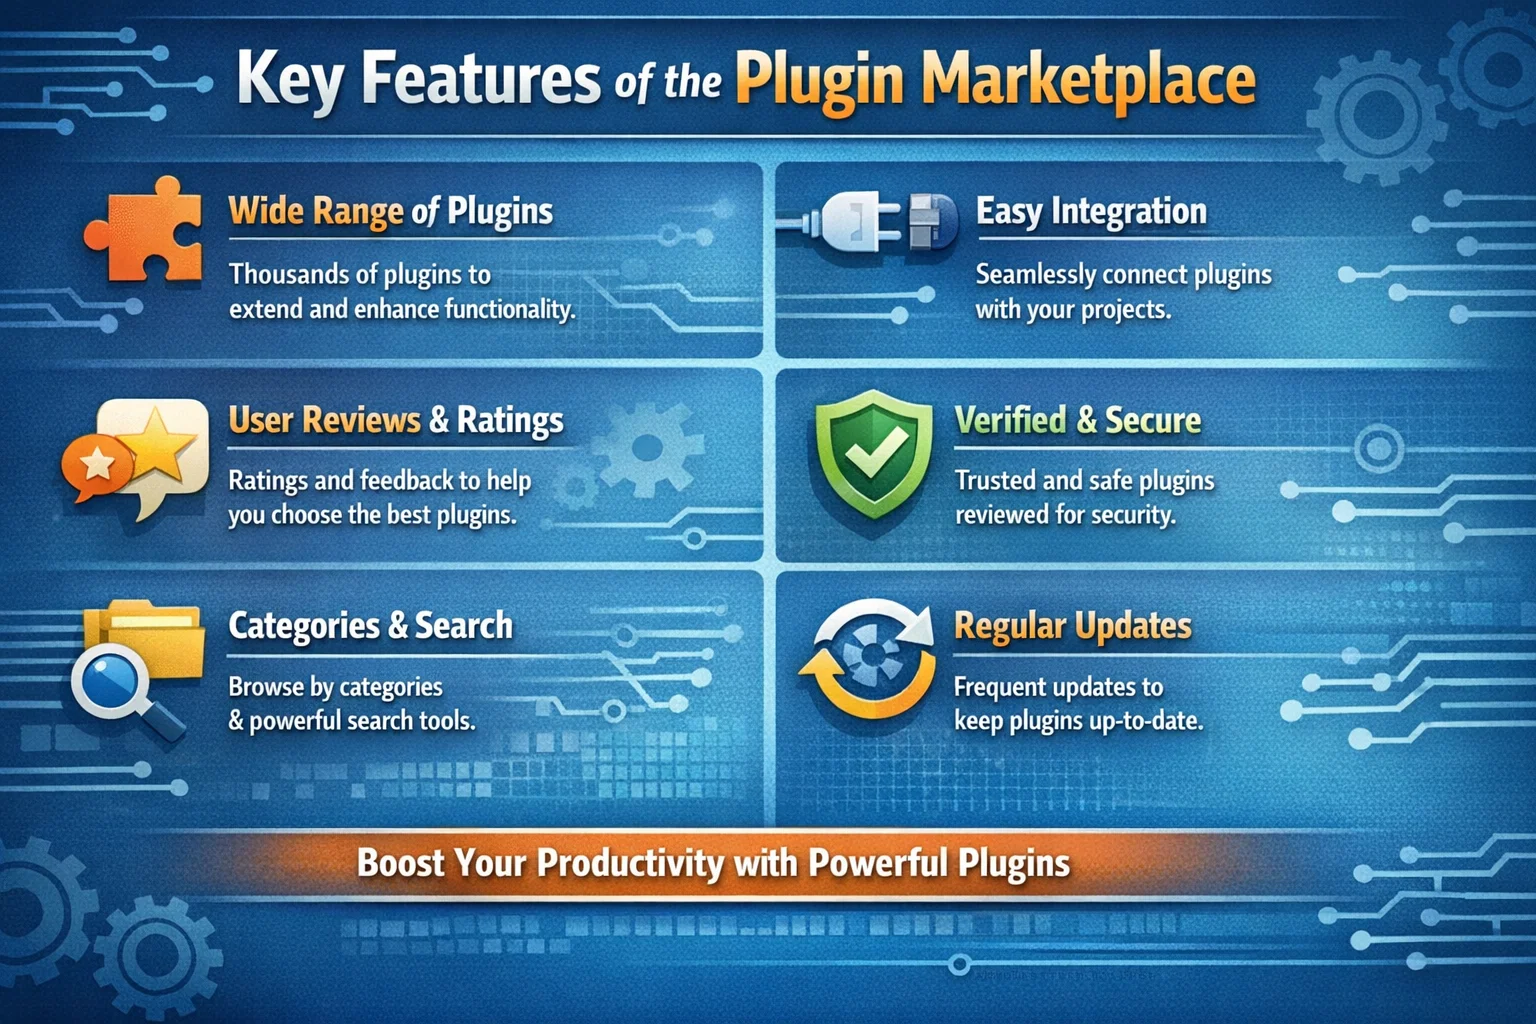
Key Features of the Plugin Marketplace
The Cursor plugin marketplace features a user-friendly interface, making it easy for developers to create, deploy, and manage plugins. The platform also provides a range of tools and services, including APIs, SDKs, and documentation, to support plugin development. Additionally, the marketplace includes a review and rating system, allowing users to evaluate and compare plugins based on their quality, functionality, and performance. As stated by the GitHub community, the use of open-source plugins can significantly accelerate the development of AI applications.
The launch of the Cursor plugin marketplace is a significant milestone in the development of AI agents, and we are excited to see the innovative plugins that will be created by our community of developers. – Cursor Team
Future of AI Agents and Plugin Marketplaces
The launch of the Cursor plugin marketplace is a clear indication of the growing importance of AI agents and plugin marketplaces in the technology industry. As AI continues to evolve and improve, we can expect to see more innovative applications and use cases emerge. The use of cognitive services and conversational AI can significantly enhance the capabilities of AI agents, enabling them to interact more effectively with humans and perform complex tasks. As reported by FutureTools News, the future of AI agents and plugin marketplaces looks promising, with significant opportunities for growth and innovation.
Ever wondered if you could take a scene from your favorite movie and seamlessly swap out the main character for someone entirely new, just using a single reference image? Thanks to the incredible advancements in generative AI, this is no longer science fiction. In this guide, we’ll explore the amazing capabilities of MoCha AI, a free and open-source tool that offers end-to-end video character replacement with stunning accuracy.
Swap any character in an existing video with a new one using a single reference image.
Developed by the “Orange Team,” MoCha AI is a powerful new framework that stands out for its ability to create high-quality, consistent character replacements without needing complex structural guidance. Let’s dive into what makes it so special and how you can use it yourself.
MoCha AI is a free, open-source AI tool designed to replace any character in an existing video using just a single reference image of a new character. Its advanced model is capable of capturing and transferring complex motions with incredible detail. The key features include:
Full Body Motion Transfer: It perfectly matches the movements of the original character, including subtle hand gestures and body language.
Facial & Lip Sync Fidelity: The new character’s facial expressions and lip movements are synchronized with the original audio and performance.
Seamless Integration: MoCha AI excels at matching the white balance, lighting, and colors of the original video. This ensures the new character blends into the scene naturally, avoiding the “pasted-on” look that other tools can produce.
Intelligent Segmentation: The tool is smart enough to identify and replace only the target character, leaving other elements like background scenery and even subtitles completely untouched.
How MoCha AI Stacks Up Against Competitors
While similar tools like Wan Animate and Kling also offer character animation, the video highlights several areas where MoCha AI demonstrates superior performance. In side-by-side comparisons, MoCha consistently produces more realistic and better-integrated results.
MoCha (labeled “Ours”) shows better color and lighting consistency compared to Kling and Wan-Animate.
The primary advantage is its ability to preserve the original scene’s color and lighting. In several examples, including a tricky scene with a moving lightbulb, MoCha’s output looks far more natural. The character feels like they are truly in the environment, whereas results from other models can appear washed out or poorly lit.
Furthermore, MoCha AI handles unconventional characters, like those wearing masks, much more effectively. In one test, Wan Animate failed to generate the masked character properly, while MoCha inserted it seamlessly, retaining all the details from the reference photo.
For those interested in exploring other powerful video manipulation tools, check out our comprehensive reviews in the AI Tools & Reviews category.
Getting Started: How to Install and Use MoCha AI with ComfyUI
The easiest way to run MoCha AI locally is through ComfyUI, a popular node-based interface for generative AI models. The video uses a custom wrapper node that makes the process straightforward.
Step 1: Install the WanVideoWrapper for ComfyUI
This entire workflow runs on the “ComfyUI-WanVideoWrapper,” a custom node developed by user Kijai. If you haven’t already, you need to install it in your ComfyUI’s custom_nodes folder. You can do this by cloning the repository from GitHub.
Once cloned, you’ll need to install its dependencies. If you use the portable version of ComfyUI, you can run the following command in your ComfyUI_windows_portable folder:
MoCha requires several models to function correctly. The workflow file handily includes the links, but here’s what you need:
The MoCha AI Model: The original model is quite large. Thankfully, there is a quantized FP8 version available which is smaller (around 14.3 GB) and works well for consumer GPUs. Download this and place it in your ComfyUI/models/diffusion_models/ folder.
VAE & Text Encoder: You’ll also need the Wan2.1 VAE and a UMT5 text encoder. Place the VAE in the ComfyUI/models/vae/ folder and the text encoder in the ComfyUI/models/text_encoders/ folder.
(Optional) LightX2v Model: To dramatically speed up generation, it’s highly recommended to download the LightX2v LoRA model. This can reduce the required steps from 20-30 down to just 6. Place this file in the ComfyUI/models/loras/ folder.
Step 3: Set Up the Workflow
Once all models are downloaded and placed in the correct folders, restart ComfyUI. Drag and drop the MoCha workflow JSON file onto the interface to load it. Now you can start setting up your generation!
Load Your Video: In the “Load Reference Video” node, upload the video you want to edit.
Create a Mask: The first step is to generate a segmentation mask to tell the AI which character to replace. The workflow guides you through this; you use green dots to select parts of the character and red dots to select parts of the background (or objects to exclude). This helps create an accurate mask.
Load Your Reference Image: Upload the image of the new character you want to insert into the video. For best results, use an image with a clean, simple background.
Generate! With everything set up, you can run the workflow. The MoCha AI will process the video frame by frame, replacing the original character with your new one while matching the motion and lighting.
The process can take some time depending on your hardware and video length, but the results are truly impressive, capturing everything from hand gestures to reflections on surfaces.
To dive deeper into the technical aspects or contribute to the project, you can visit the official MoCha AI GitHub page.
Final Thoughts: The Future of AI Video Editing
MoCha AI represents a significant leap forward for open-source character replacement tools. Its ability to create seamless, high-fidelity results opens up a world of creative possibilities for filmmakers, content creators, and AI enthusiasts. By leveraging the power of ComfyUI, it’s more accessible than ever to experiment with this cutting-edge technology right on your own computer. This is without a doubt one of the best character transfer tools available today.